Custom Lockers

Custom Lockers, Green Bay
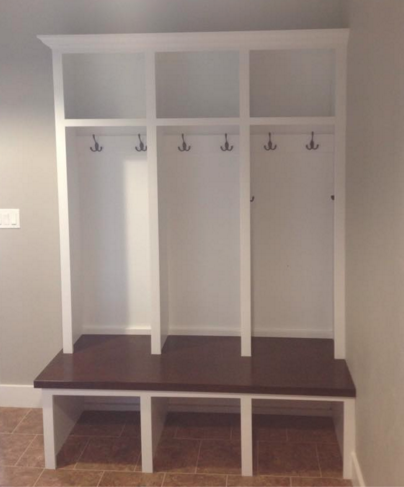
Keeping your home tidy can be difficult under the best of circumstances, especially when you have kids. Whether in your front entryway, mudroom or laundry area, custom built locker cabinets can give you the storage you need to keep everything neatly organized without taking up precious space.

Lockers can be created to fit any space in your home where you need a stylish and functional way to arrange coats, shoes and other items. If your home does not have a custom closets Green Bay, lockers can be a lifesaver. Lockers are a great option for coat storage with hanging hooks. This can also double as sports equipment storage for you and your busy children when they get home from practice or a game, or simply to hold your recreational gear that you want easy access to. Whatever your needs, Distinctive Cabinets can create the space perfect for your family.

Having sufficient space in your home, to keep your everyday items organized and to keep clutter to a minimum, is not only a time saver, it can also keep you from pulling your hair our trying to remember where you put something. Creating custom locker spaces within your house can ensure that there is a place for everything, and you can keep everything in its place. No matter the aesthetic of your home, we can create a customized solution that will feel like it was always meant to be there. Whether you are looking for a traditional style entryway with a bench for taking off your shoes, or a sleek modern locker with drawers to keep any mess out of site, Distinctive Cabinets is able to work with you to meet your needs.

Entryway lockers are also a great way to store shoes and boots, especially during the winter months when you do not want to track snow and salt through your home. By creating open cubbies underneath your custom lockers, you can place your muddy or snowy shoes on plastic mats and keep your floors clean. For small children who may not be able to reach the hooks for hanging coats, cubbies underneath can also be a great place to store a small step stool that the little ones can get their outdoor wear without having to wait for your help, making getting them to school in the morning easier on the whole family.

No matter the size of your home or your storage needs, Distinctive Cabinets can help you create a customized space to keep you organized and your sanity intact. Oh, and by the way, we can not guarantee that your kids will actually hang up their coats 🙂

Preparing for Winter in Green Bay

Green Bay Custom CabinetsGreen Bay winters can be brutal. Averaging almost 46 inches of snow each winter, it is important to take steps to avoid any mid-winter problems, and to avoid term damage to your home. Use these tips from Distinctive Cabinets to lower your winter energy bills and keep you and your family cozy this winter season.

Here are a few of the first steps to take before the weather turns, starting with exterior maintenance.

Lawn and Garden

  • Winterize your lawn by aerating and applying a winter fertilizer before the ground freezes
  • Bring any fragile clay or porcelain pots indoors and clean to avoid freezing and cracking
  • Trim back any trees or hedges that are overgrown or are overhanging your home. Ice and snow buildup can cause them to break causing damage not only to the plant but potentially to your home
  • Clean any leaves or needles from decks and around downspouts
  • Inspect any outdoor wooden surfaces such as decks, handrails or planters. Treat them if necessary to prevent any damage during the moist winter
  • Shut off any exterior faucets and drain the lines to prevent any pipes from freezing or cracking. The average winter low temperature in Green Bay is less than 10°F, which will cause any water to freeze and expand. The same also goes for any water lines for sprinklers you may have
  • Remove any hoses from your yard or deck, drain them and store them indoors to prevent freezing and warping
  • If you have space, bring outdoor furniture indoors. If you do not have space however, clean your furnishings and cover with a heavy tarp to prevent any snow or ice damage
  • Lastly, for safety, inspect all of your outdoor lighting and handrails to make sure they are all functioning properly and secure. This can prevent slips and falls during icy Green Bay winters

Home Exterior

  • Check your roof for any damage to shingles and flashing. Make any necessary repairs before the first snow to make sure you do not have any leaks during the winter. Seal any joints where water can get in and freeze, which will make the problem much worse
  • Clean and check all gutters and downspouts to ensure proper drainage all winter long
  • Make sure all vents and chimneys have proper coverings on them. Rodents and birds love having a warm spot to spend the winter, but make sure it is not inside your home
  • For wooden window frames, check for signs of rot, splitting or decay. Repair or replace the framing if necessary

Winter Tools

  • Before you need it, check your snow blower to ensure that it is fully functional. Changing the oil and spark plugs can make it much easier to get it started when that first big snowfall hits
  • Winterize other outdoor equipment by cleaning off any debris any emptying gas tanks if necessary
  • Organize your garage or shed to make sure that all of your necessary winter equipment is easily accessible. Customized cabinets can keep all of your tools and shovels handy for winter and store your summer equipment until needed again
  • Stock up on snow melt, salt or sand to prevent slippery sidewalks or driveways before the stores run out

Just as important as the exterior of the home is the interior. Making your home more energy efficient only takes a few steps, and your time is well worth it to save on your energy bills year round.

Windows and Doors

  • Weatherstripping should be checked around all doors and windows. If necessary, install or replace existing damaged weatherstripping to prevent air leaks and heat loss
  • If you have storm doors and windows, inspect them for any damage and install them
  • If you feel any drafts around window frames, use caulk, inside and out, to keep heat from escaping
  • Replace any broken or cracked window panes

Fireplace

  • Check your firebox and flue system to ensure that there is no soot or buildup that can create a fire hazard
  • Drafty fireplaces, even when the flue is closed, can mean that your damper is warped or damaged. Inspect it and repair or replace as necessary
  • Inspect chimney for any cracks or damage and repair as needed

Ventilation and Air Conditioning

  • Replace your furnace filter to improve efficiency and improve overall air quality in your home
  • Remove any window air conditioning units and make sure the windows are fully sealed and insulated. Clean the air conditioning units and store for winter
  • Consider replacing old thermostats with programmable thermostats to save on heating and air conditioning costs year round
  • Check that all smoke and carbon monoxide alarms are functioning and have fresh batteries if necessary. Because you have your windows closed during those cold Green Bay winters there is a higher likelihood of dangerous carbon monoxide buildup
  • If you have ceiling fans, make sure that they are switched to blow air down for the winter. This will push warm air from the ceiling down toward the floor making your heating more efficient
  • Check any exposed ducts for leaks and seal as needed

By taking these steps to make sure your home is ready for winter, you and your family can build your snowmen and sip hot cocoa without worry.

Playroom Storage

Playroom cabinets green bayPlayroom storage is not only functional, but can be fun and creative as well. There are many options depending on your space, but one thing is sure: keeping an organized play space will make your home feel less like a disaster area.

The first way to maximize your space is to not forget to use the wall space. Customized wall shelves can create storage space that can also grow into decorative space as your children grow. Using bins or baskets to organize items on shelves creates a clean and versatile space that does not take up any floor room.

Corner bookshelves can also give you room for more toy and book storage by utilizing a space that may otherwise be vacant. Consider one that goes up to the ceiling to give you the most room and store items on the top shelves that the kids do not use often. However, if you are using tall furniture, consider wall anchors to make sure that there is no hazard of it tipping.

A way to create both seating and storage is to take wooden storage cubes and add casters to them. This not only adds to your storage, it creates mobile seating to move around as necessary. If you have more space to work with, consider an ottoman or bench that also has storage inside.

An activity table built at children’s height can also create a functional space for activities. Side cabinets built into the table can hold items like coloring books and crayons. Using a countertop instead of wood on the top can make art project cleanups easier, along with making the table more durable for the long run.

Turn your child’s playroom into a room that the whole family can enjoy by creating a space that is fun and functional.

Cleaning and Sealing Garage Floors

Just before those Wisconsin winters when there is a crisp in the air, but you can still get outdoor work done without freezing, is the perfect time to clear out your garage and clean and seal your garage floors. If you want to make an even more lasting impression, you can paint your garage floors to make your space not only more attractive, but much easier to clean (especially with all the road salt your car will be experiencing). Using simple steps, a few tools you already have and a quick trip to your local home improvement shop, you can have garage floors that will last longer and dazzle.

Remove Debris

You’ll want to start with a vigorous sweeping with a rigid push broom to get the first layer of dirt, leaves, etc. from the garage floor. This may seem like a simple step but it will make finding the spots for the next step even easier.

Remove Oil and Grease Stains

Removing grease stains may seem tricky, but there are some everyday items that you may already have that will help easily lift them from concrete. Using sawdust or a clay kitty litter, cover any stains in a thin layer, leaving it to sit for at least a day. This will help to draw out the oils from the floor.

After letting sit, use your push broom again to sweep up all of the sawdust or litter. Next, pour dry dishwashing detergent or a concrete cleaning product onto the spots and let sit for at least 45 minutes (or if using a concrete cleaning product follow the manufacturer instructions.) Using boiling water and elbow grease, pour enough over to create a paste and scrub scrub scrub! For very stubborn stains there are specialty products that can be found at most home improvement shops.

Remove Rust Stains

There are many products on the market to remove rust stains, and chances are you already have some in your cabinets. Using at full strength, wet the concrete with the product, and then once again scrubbing will be your friend. After a thorough scrubbing, let sit for 15 minutes, then rinse completely.

Pre-Prep for Sealing Floors

The last steps for prepping your floors for sealing are filling in cracks, and making sure the sealant will adhere.

Using an epoxy paste fill in small cracks, scraping the epoxy off the surface to create a flush surface. For large cracks, over fill the crack, let it dry, then sand until the surface is smooth.

If you’re not sure if your floor has already been sealed, the simplest way to test is to pour water on the surface. If the water sinks in, it is not sealed. If it beads up, it is. If it has already been sealed and you want to reseal or change sealant, you will need to etch the floor first. Using a commercial concrete etching product, follow the manufacturer’s instructions carefully. Let the floor dry overnight after to allow for maximum adhesion.

Seal your Floors

You are now ready for your final step! Sealing your floor prevents future staining and prevents concrete dust. Choose a product that is water-based or solvent-thinned epoxy which will help it go on more easily. Start along the edges using a nylon brush. Once you have gotten the perimeter of the floor or any tricky spots, you can then switch to a lint-free, solvent-resistant, medium-nap paint roller. This will make the job quicker and give you a more consistent product.

If you plan on painting your floor, use a sealant that also has a primer built in to help the paint adhere. Follow the same steps as above, but be sure to let the sealant dry for at least 8 hours before painting. When choosing which paint to use for your floor, be sure to choose an epoxy paint specifically meant for garage floors. Using the brush and roller method again, paint the floor evenly. Allow at least 24 hour between coats until you have the look you desire!

Your garage floors are now ready for the winter and to look great for years to come!

Countertop Style Guide

Granite Countertops Green BayWhen planning a kitchen re-do or just a facelift, one thing that needs to be considered is the style of countertops you’d like. However, there are several types, each having their own unique characteristics. Below we’ll break down the basics of different materials for countertops to help you better decide what is best for your home, budget and lifestyle.

While there are a plethora of other surfaces such as tiled, concrete and wood, we will focus on the “main” styles: marble, granite, quartz and solid surface.

Marble

Marble is a natural stone that occurs in several parts of the world, each region having its own specific traits. Marble tops come in large slabs, with no two being identical. Veining of colors through marble is common and can create a nice contrast to the normal 90° lines you’ll find in most kitchens. This also makes each countertop unique giving your kitchen a customization that cannot be matched.

As with all natural stone, it has properties that can be both good and bad in a kitchen environment. It is a porous stone that can lend itself to staining and also scratching. Also, due to its chemical makeup, it is susceptible to etching from acids (though there are steps to prevent this).  It is however hard enough that it is chip resistant, can be polished, and is heat resistant. You can get it in several finishes depending if you want highly polished or a more matted look.

It is an ageless look that many high-end kitchens opt for, but it is likely the most expensive option. However, if you are looking for something special to go with your kitchen cabinets, marble is a great choice.

Granite

Also a natural stone, granite is a harder material than marble, meaning it is scratch resistant. Again, each slab is unique, but granite is available in a much wider variety of colors, ranging from nearly pitch black to white with many colors in between. Also, due to granite’s structure it is low maintenance in comparison to marble making it easier to care for. Spills can simply be wiped up and it is resistant to most chemicals.

This is very popular choice for kitchens both modern and classic as there are many choices for colors and veining. The ability to choose which slab or slabs you want for your counters is particularly attractive without the price-tag of marble.

Quartz

Although quartz countertops are made up of natural quartz stone, they are human engineered. Quartz stone is ground and mixed with resins and coloring to make a natural looking product but with more consistency. This allows you to use the material throughout your kitchen and even in other parts of your home all while keeping your look the same. The resins not only make the top scratch resistant, it also makes it non-porous. This means that the top does not need to be sealed unlike natural stone countertops.

Quartz comes in a variety of colors, finishes, patterns and even styles such as metallic flakes. You can now get quartz tops that mimic the looks of marble and granite, and is typically similarly priced to granite.

Solid Surface

Unlike stone countertops, solid surface countertops are completely man-made. This means that they come in a huge variety of colors, patterns, shapes and can be 100% customized to your home. Each piece is molded to fit the specific shape, and can even have a backsplash seamlessly molded with it. This eliminates any gaps where crumbs or bacteria can hide causing mold or bacteria growth. Solid surface is also the only material that can integrate a sink seamlessly.  Due to it being man-made, there are options of patterns that mimic wood, marble, granite, and solid and patterned designs, giving you choices for complete customization. Solid surface does not need to be sealed, is non-porous, and is stain and moisture resistant making it very low maintenance.

However, due to the nature of the material, it is also not as scratch- and heat-resistant. Also, the typically acrylic material can give it a “plastic” feeling that is not as high-design as natural stone options. Depending on the brand, options and style you prefer, price ranges can vary greatly. This is typically a middle of the road pricing option, but can be equal to granite with all the bells and whistles.


Take time to think about your daily routine in the kitchen before choosing a surface material. Design, budget, daily usage and your willingness to perform maintenance are all factors in what type of countertops are right for you and your family.

Impress Your Guests With Your Home Entrance

Distinctive Cabinets Green Bay - Front Door

A concrete walkway bordered with hedged shrubs leads to the front door of a home. There are windows on either side of the door. Horizontal shot.

They say first impressions are everything. The same goes for your home. Whether entertaining guests or just having family over for a casual get-together, your entrance makes an instant impact. Here are some easy guidelines that pack a punch without a whole renovation.

Impressions Begin Outside

Before your guests even walk in the door, your home entrance is saying something, hopefully something good!

Front Door:
Does your front door need a bit of a facelift? A simple coat of durable outdoor paint and new hardware on your front door can make a world of difference. Not all doors need to be white. A color complimentary to the outside of your home with trim in another color can make it stand out and invite your guests in.

Lighting:
Nobody wants to walk up to a dark front porch or entrance. If you have a long walkway, one simple way is to install movable solar lights to welcome company. A warm, welcoming front porch light will let your guests know the front door is always open for them.

Decor:
Part of making your front entrance space welcoming is making sure that your guests have enough room to enter. A simple potted plant on each side of the front door along with a door decoration is all you need. Having too many items on the front porch can make it crowded and difficult for guests to enter comfortably.

Inside Your Home

When most of us get home, our first step is to throw your keys on the nearest convenient surface, plop down the mail, take off our shoes and coats and leave them wherever available at the time. This can lead to a cluttered, messy and uninviting entrance for guests. Use the tips below to make sure your guests (and your family) are excited every time they enter your home.

Declutter: Instead of just throwing your keys, sunglasses and wallet wherever you can, make designated spaces for everything. Try decorative boxes or baskets for your items that can be slid away keeping the entrance looking tidy. If you have a small entrance table, decorative boxes with lids are perfect.

Shoes are another eyesore (and tripping problem). Create a designated area for shoes, such as putting in a slim bench to sit down, take your shoes off, and set them underneath. Plastic trays with a lip around them can help catch dirt, rain and snow from your shoes during those Wisconsin fall and winter months so that you do not get your floors dirty, and helps keep them organized.

For small entrances were there is no room for a table or bench, a floating wall shelf with hooks on a rail installed underneath can give you a place to put a basket for gloves and sunglasses, while hanging your keys and other items underneath, keeping it organized and out of the way. For shoes in small spaces, install floating double-decker shoe racks to keep them off the floor.

Another option, if space permits, are built-in custom cabinets and bench for your space. This is especially great if you have children! Each kid can have his or her own cubby hole to store their jackets, backpacks and shoes when they get home from school, and you’ll never have to track down your children’s coats again on the way out the door. It works just as well for adults too.

Lighting: When entering your home, the space should be light and welcoming, not dark and foreboding. If you do not have a ceiling light in your front entrance, consider a small but airy table lamp. This will lighten up the space while making sure that the lamp itself does not take up too much room. If you do have a ceiling fixture, consider making it a hanging ceiling lamp. You’ll want to hang it about 6’8″ from the floor to ensure it still catches the eyes of your guests but is not too low to make the space feel cramped. You want your guests to want to continue in from the entrance to the rest of your home.

Decor: The best part of home entrances is that since they are typically small, you can use the space to make a bold statement without a lot of investment. These can be fun places to have an accent wall with a bright color or wallpaper, or a wall of arranged art or pictures. Another great idea for front entrances is hanging a mirror or mirrors. This not only will make the space seem larger and brighter, but your guests can check what they look like on the way in (and you on your way out). Mirrors with shelves can allow you to put small candles on them, and when lit the reflection will provide a warm glow to your entire entrance, making sure your guests feel right at home.


Use these simple ideas to upgrade your home’s entrance and make sure everyone feels welcome right from the start, yourself included.

Wisconsin Fall Canning

Green Bay is blessed with fertile soil and 4 beautiful seasons, but with the onset of winter, it’s time to harvest your gardens and get the last of what you can from the Farmer’s Market. However if you have a plentiful bounty, you may not be able to eat it all before it starts to spoil. Canning is a great way to preserve your fruits, vegetables, sauces and jams. Follow these steps to end up with a pantry or root cellar chock full of gorgeous jars of fresh produce that will last you through the winter and then some!

Types Of Canning

There are two main types of canning, and which method you use will depend on what it is you are preserving. As a rule of thumb, pressure canning, which uses a pressurized canner, is used for vegetables. For fruits, jams, pickles and sauces, water bath canning is preferred. Always consult your recipe to see what it recommends for pressure canning or water bath, times, and pressure.

Fresh Produce

You always want to start with the freshest picked produce for canning. This will give you the best flavors and textures. If you’re canning sauces or salsas, be sure to can as soon as you are finished making your creation.

Equipment

  • Pressure canner/cooker
  • Canning jars
  • Lids and rings for jars
  • Jar lifter
  • Towel/Pot holder
  • Other pots

Pressure Canning

In order to start pressure canning, you’ll want to fill your pressure canner with 3 quarts of water. You do not need to fill nearly as much as you will if water bath canning as this method is about building up the pressure for heat. You just need enough water to make sure that it does not boil dry. If you have a recipe that calls for long pressure canning you may want to add more water.

Always start with clean jars and lids. Either hand wash with warm soap and water and rinse well, or run through the dishwasher on a hot cycle. When pressure canning you do not need to sterilize since the pressurizing process will do that for you.

Next step is to keep the jars and the seals hot so that when you’re adding the ingredients in, you do not cause dramatic temperature changes. If you washed them in the dishwasher, keep them in with the heated dry on. If you hand washed, place the jars upside down in a large pot with 2 – 3 inches of water, bring to a boil, and then remove the pot from heat. Leave the jars in the water until ready to use each one. If you’re using this method, you must also keep the seals warm. You can use another, smaller pot to heat the seals.

After you have prepared your recipe, fill your jars, using a funnel if necessary. After your jar is filled, wipe the rim of the jar with a clean cloth or tea towel to make sure everything will seal properly.

Place your seal and then ring on the jar and just finger tighten. You do not need to over tighten as they will seal themselves.

Your pressure canner should have a rack on the bottom. Cans should never sit directly on the bottom of the pot, and never be touching one another. This may take some time to get everything situated properly but it is necessary for the circulation of water and steam.

After everything is set, place your lid on your pressure canner, but with the steam vent/gauge hole open. Bring the water to a boil and let it steam for 10 minutes. After that time, close the vent or add your gauge weight and let it come to pressure. Once it comes to the pressure that the recipe calls for, that is when you start your timer. In order to maintain the pressure called for, you will need to adjust your heat, so don’t walk away from the kitchen! You do not want the pressure to dip below what is called for in the recipe you are making.

When the time is up, turn off the heat. Do not vent or try to cool or open. You want the pressure to drop to 0 by itself. This will take some time but it is a necessary part of the canning process to make sure your food will be safe to cellar.

Once the pressure is at 0, you can open the canner. Using your jar lifter, pull your jars and either set on a towel or a wooden cutting board.

This is when patience sets in, but you can finally leave the kitchen. Each jar needs to stay still to cool on its own. As they all cool, you will hear the “pop” of the lid sealing. This means your jar is sealed properly! If, after several hours any jars have not sealed, the food is still safe to eat if you refrigerate it right away and eat it within several days, depending on what the product is.

After everything is cooled to room temperature, make sure to label label label! While you may know what everything is right now, that may not always be the case. Either on the lid, bottom, side, or wherever works best for you, write the contents of the jar and the date.

You’re now ready to store!

Water Bath Canning/Boiling Canning

Most of the steps are the same as pressure canning, however it is used for delicate products such as apple sauce or pickles, that cannot handle the high heat or pressure canning.

As before, you always want to start with clean jars and lids and keep them warm in the same manner. One difference however is that you may need to sterilize your jars. If the recipe you are preparing calls for less than a 10 minute boil, then your jars will need to be sterilized beforehand.

To sterilize your jars, place in a large pot of water (always with a rack on the bottom), cover with water by two inches, and boil for 10 minutes. Turn the heat off and leave the jars in the water until ready to use each one. Empty the hot water just before filling with your jams or fruit.

Once your jars are filled and sealed, place in the canner or a large pot with a rack on the bottom. Add hot water until the jars are covered by 2 inches, again making sure the jars are not touching.

Bring the water to a boil, then start your timer for as long as your recipe calls for. Check occasionally to make sure your pot is maintaining a boil. Once finished, let the water cool for a few minutes, then remove the jars from the water, again placing on a towel or board.

The cooling process is the same, waiting for them to cool, pop, return to room temperature, and label. Now you have beautiful fruits for over ice cream or for pies!

Ideas For Wisconsin Fall Canning

Canning end of summer and fall vegetables means you have fresh tasting produce on your hands all winter without having to pay at the store. Some of the easiest and most abundant ideas for a Green Bay fall garden are:

  • Apple Sauce
  • Apple Pie Filling
  • Tomato Sauce
  • Salsa
  • Pickles
  • Halved Pears
  • Green Beans
  • Rhubarb Sauce
  • Pickled Spicy Peppers

Pantry or Cellar Tips

  • Custom cabinetry can be made for existing spaces in your home that are specific for your needs and amount of canning you do. Whether in a pantry or basement, there are many options to fit your style.
  • Always label your jars! There are templates you can download if you want everything to look uniform, or a marker on the jar always works and can wash off when you are done.
  • For organization, label your shelves with what types of goods are on them. Keep vegetables, fruits, jams, sauces, pickles and salsas in designated areas so that you know what you have available at a glance.
  • If you have more than one season of canning, move the older jars to the front when adding the new batch. This will ensure that you don’t end up with that 5 year old jar in the back you forgot about.
  • For safety, a thin board across the bottom front of each shelf can keep your kids (or you) from accidentally pulling out more jars than anticipated or having one land on your foot!

Canning is a great way to spend time with your family, both picking the produce, making the recipes and doing the canning itself. Have fun with it and you’ll reap the (delicious) rewards for months to come!

Spice Organization & Storage

Our spice cabinets have a tendency to be a catchall for any and all spices and salts that we ever buy. But how often do you actually go through and see what you really have? Here are some tips to get your spices organized in a way that works for you, and make sure all of your spices are at their best.

Go Through All Your Spices

Different spices have different shelf lives, which makes going through all of your spices the very first step. Pull everything out of your spice cabinet or drawer. While most spices don’t “go bad”, they will lose their flavor and color. As a rule of thumb, whole spices last 4 years, ground spices last 2 years, and dried spices last 1 – 3 years depending on the spice. Salt can pretty much last indefinitely if kept in a dry environment. The next test to make sure your spices are still viable is taste and smell. If any spices have lost their flavor or color, it’s time to toss. After you’ve gotten rid of any spices that are no longer good, consolidate any spices that can be. Do you have three different bottles of ground cinnamon? Put them all in one container.

Decide Organization System

Each cook has a different way they use their spices and how often different types are used. There are four main ways that you can organize depending on what makes the most sense for you and your kitchen.

The first way is to organize by frequency of use. Take those spices that you use the most and set them in the most prominent place, usually the bottom shelf of your spice cabinet in the front. For those second most used, place in the front of the second shelf, and so-on. For those spices you rarely use, maybe mustard seed, can be placed in the back or on the highest shelf. For your spices that are in large bags, like dried peppers, a decorative bin or basket can contain them all while keeping your cabinets looking nice.

Next up for systems is baking spices vs. cooking spices. If you’re primarily a baker, making fall apple pies for your family, then you’ll want to prioritize those items and put them in your most prominent spot. Again, put what you use most up front. Same goes for if you’re a cook more than a baker. Do you like to cook Italian food? Then put your basil, oregano and parsley up front.

You can also arrange your spices by whole, dried, and ground. This way if a recipe calls for ground thyme instead of thyme leaves, you’ll know where to look. Some cooks prefer only purchasing whole spices because they retain their flavor and shelf life better, so this next method may be better for that.

Lastly, and maybe more labor intensive, is alphabetical. Although it takes longer to initially do and it may be harder to maintain, if you’re in the middle of a recipe and realize you need a spice immediately, you can find it right away!

There are many ways to organize your kitchen cabinets, so choose what works best for you!

How To Store Spices

The number one key to keeping your spices fresher for longer is keeping them in a sealed container. Glass or plastic jars or bottles work the best since they will not rust. Keeping your spices dry maintains their freshness and helps seal in their flavor. Another tip to keeping your spices dry is to NOT shake your spices directly over cooking food or boiling water. This will cause moisture to get into the jar and will get sealed in when you put organized spices back. A better tip is to mix your spices that will be used into small prep dishes and then, when ready, use them in your recipe.

Another important storage note is that you want to keep your spices out of direct sunlight. Heat can cause your spices to spoil more quickly, and if there is moisture in the jar, they can even go rancid. A dry place out of the sun is your best bet.

Storage Options

Many Wisconsin homes have the overhead cabinets in the kitchen, and typically one is set aside for spices. If you’re tight on space, there are a couple of things you can do to make the most of your cabinets. One easy fix are tiered lazy Susans made specifically for spices. This way you can not only stack your spices but you can turn the table to see all of your options. An alternate to that are small wire shelves in your cabinets to also give you double the surface area without having to dig through your spices. Within cabinets, you can also mount slide out shelves to make perusing your spices easier.

If you want to keep your most used, every day spices, such as salts and peppers within arms reach, a small, shallow wall shelf (placed out of direct sunlight) can give you easy access in seconds. One last handy trick for those of you who want a bit of flare with your spices: mount a magnetic knife strip underneath your hanging cabinets. Spice jars that have metal lids then can hang and be right there for you to grab at any moment.

These tips and tricks should make your family’s mealtime easier and more enjoyable!

Chalkboard Kitchen Wall

Are you looking to add a fun and functional touch to your kitchen but on a budget? A chalkboard wall can be a great DIY way make your wall into a shopping list, menu or even art space for the kids. Chalkboard paint now comes in more than just black, so great creative! Follow these DIY tips to wake up your kitchen without spending a lot of money.

Choose Your Wall

Since you have to prep your walls before painting it is important to choose which wall you want to chalkboard paint first. If you’re planning on having the kids draw on it, it’s important that they can reach the area. Keep in mind that you do not have to do an entire wall either. Visualize what you want your kitchen look like and plan from there.

Prep Your Wall

Tools you will need include:

  • Clean lint-free cloth
  • General purpose concentrated cleaner
  • Bucket and warm water
  • 100-grit sandpaper or primer
  • Paint roller extension handle
  • Gloves
  • Drop cloth
  • Safety glasses
  • Step ladder
  • Paint tray

Materials you will need include:

  • Painter’s tape
  • Respiratory mask
  • Chalkboard paint of your choice
  • Small paintbrush

Since kitchen walls have a tendency to accumulate more grease than other rooms, you’ll want to start by cleaning your walls. Lay down tarps around any place you will be painting. After removing all decorations and nails from your wall, take a bucket of warm water and the cleaner of your choice and dilute per manufacturer’s directions. Using a lint-free rag, wipe down your walls removing any grease or food debris.

Depending on the type of walls you have, you have two main options for the next step of prep: fine-grit sand paper or primer. If your walls have a lot of damage or heavy texturing, primer may be easiest to smooth them out. However, if your walls are in fairly good condition, then a light sanding to rough up the surface should do the trick. If sanding, sand completely top to bottom and side to side without missing any spots. If you are sanding, however, be sure to wear a mask and eye protection. Some older Wisconsin homes can contain lead paint, so, as always, safety first.

Cut In With A Paintbrush

If you have a deft hand, then edging with a paintbrush around corners, windows, baseboards, etc. should be easy enough. If you’re not confident however, then a simple application of painter’s tape will protect anything you don’t want paint on.

Rolling On Wall

Using a paint roller, tray, and extension pole if necessary, roll paint on in small areas using an up-and-down “W” motion. Follow the manufacturer’s instructions for drying time between coats and recommended number of coats.

Cleaning Up

After finishing with the painting, clean any brushes or rollers with warm, soapy water. Rinse with clean water and set aside to dry. Once the paint has fully dried, remove the painters tape and any tarps. Before using the wall, check with your manufacturer’s directions on how long you should wait, which can be anywhere from 1 to 3 days.

Enjoy!

Add your own personal touches to make your wall your own. Create a tray or box to hold chalk on the wall. Use decorative molding to create separate spaces on your wall. Write your recipe on the wall before cooking for easy reference. Make an open spice rack by adding shallow shelves and keep your most popular spices within reach. It can also be used as a family time activity to keep the kids in the kitchen but busy while you cook dinner, and then all can enjoy their art. And when you want to change your wall, use a damp rag to wipe clean and start all over!

Custom Kitchen Islands

Making the most of your kitchen space can be a tough endeavor. One way to utilize your kitchen space to maximize your form and function can be a customized kitchen island. Whether for entertaining, increasing storage, or a new hangout for your family, a custom kitchen island can transform the way you spend your time and make for a whole new space.

Size & Shape

The first item on your list to consider is how much space you have in your kitchen or bar area for an island, and what shapes will work without impeding the flow of your kitchen. Traditional square or rectangular shapes work with most Wisconsin kitchen layouts, however L- and half-round shapes can change the aesthetic of your kitchen. You want to increase your storage and useable space without taking away the ability to move through your kitchen freely.

Stationary or Mobile

While most islands are stationary and built into the kitchen, mobile islands can be a great alternative! When you’re having your Green Bay football party or children’s birthday party, it can be an invaluable option to be able to move around to fit your entertaining needs. With mobile cabinets you do have fewer options in terms of size however due to the weight and ability to move the units.

Plumbing & Electrical

Another major consideration when planning out your custom kitchen island is whether you want it to contain a sink an/or electrical hookups for appliances. When this is the case the island must be stationary, however it may also affect where in your kitchen this can be done. If you’re not already planning a major kitchen renovation, then it may be wiser to leave out plumbing upfront.

Adding options such as a prep sink separate from your normal kitchen sink can be great for gourmet cooks, or families who often have more than one cook in the kitchen. Electrical can let you easily work with your appliances in an open space, or even build your microwave or wine chiller right into the island. Working with a contractor for these types of options is your best bet.

Drawers, Shelves, Cabinets and Bins

Now that you know what size, shape and where you are going to put your customized island, you can start thinking about what types of storage options you want included with it. Nearly any combination of drawers, cabinets, shelves, pop out bins, and rolling doors are options. Think first about what you plan on using the island for primarily. Is it going to be for prep work? For entertaining? For feeding the kids breakfast before school or hot cocoa during cold Wisconsin winters? Do you want seating around it? Is it simply storage, or are you trying to declutter the appearance of your space? Pop-out bins can be great for garbage, recycling and compost bins that stay hidden when not in use. Slide out drawers are perfect for smaller utensils or kitchen items, while open shelving can be great for cookbooks or even wine glasses. The options are endless. Have fun with it and make it yours.

When it comes to kitchen islands, your ideas are the limit for what can be achieved to give you the kitchen you’ve always wanted!